
Inflatable camping tents have become increasingly popular thanks to their fast setup, spacious interiors, and impressive stability. Instead of traditional poles, these shelters rely on inflatable air beams that can be pitched in just a few minutes, making them a favorite choice for family campers, weekend adventurers, and anyone who values convenience at the campsite.
Like any piece of outdoor gear, however, inflatable tents aren’t immune to damage. Sharp rocks, thorns, accidental punctures, worn valves, or simple wear and tear can lead to air leaks that leave campers wondering whether their tent is ruined.
The good news is that most inflatable camping tent damage is easier to repair than many people expect. Small punctures, leaking valves, and minor air beam problems can often be fixed at home—or even at the campsite—with the right repair kit and a careful approach. In many cases, a proper repair restores the tent to reliable service for years to come.
In this guide, you’ll learn how to repair an inflatable camping tent step by step, how to locate hidden air leaks, which repair materials actually work, when a repair is safe to trust, and when replacing an air tube is the smarter option. We’ll also cover the most common mistakes that shorten the life of inflatable tents and share practical tips to help prevent future damage.
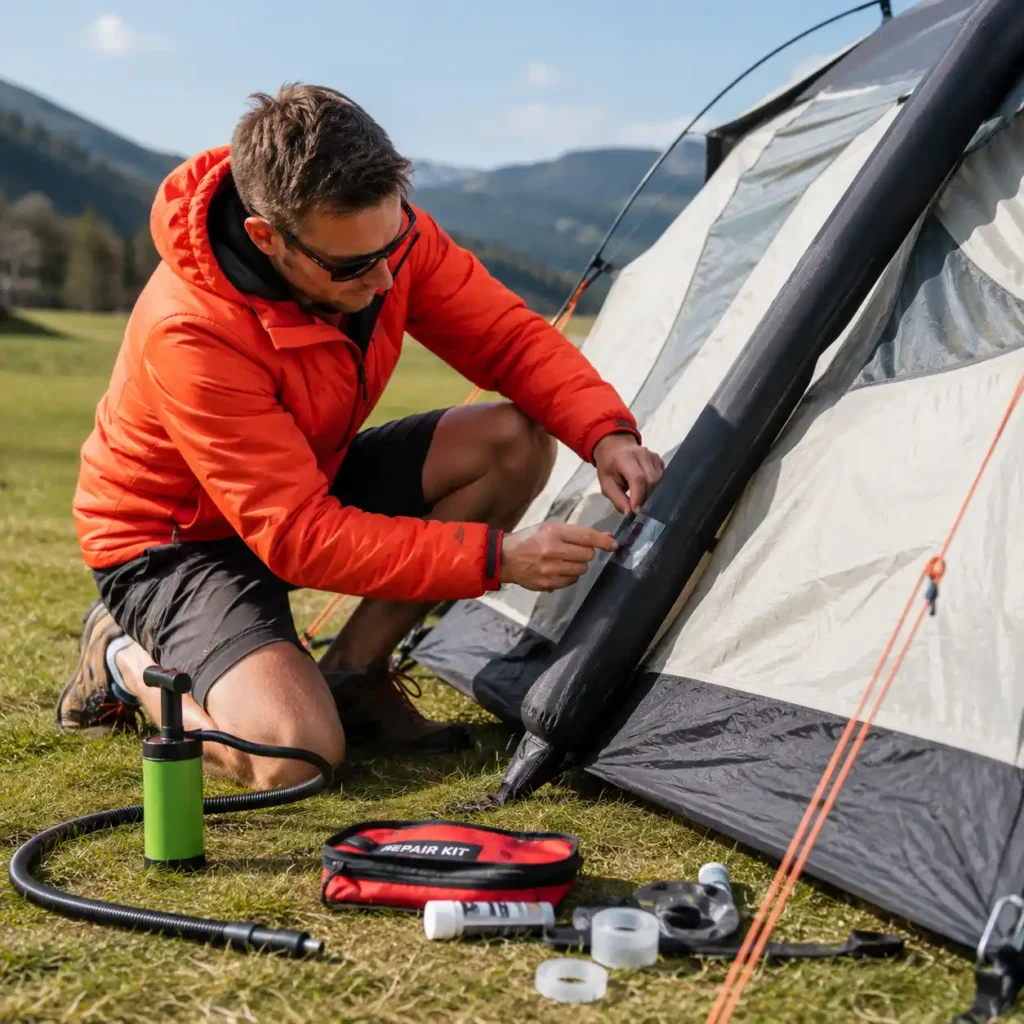
Table of Contents
Quick Answer
Most inflatable camping tents can be repaired successfully if the damage is limited to a small puncture, pinhole, or minor leak in the air beam or valve. With a quality repair kit, the correct adhesive, and proper curing time, many repairs are durable enough to last for years of regular camping.
The key is identifying the exact source of the leak before applying a patch. Rushing the repair, using the wrong materials, or skipping surface preparation often leads to repeated air loss and failed repairs.
If the air beam has a large split, severe seam failure, or extensive internal damage, replacing the air tube is usually a safer and more reliable solution than attempting a temporary fix.
In the sections below, you’ll learn how to find hidden leaks, repair inflatable tent air beams step by step, avoid common mistakes, and decide when a replacement is the better long-term option.
Why You Can Trust This Guide
Repairing an inflatable camping tent isn’t just about applying a patch and hoping for the best. A reliable repair depends on identifying the real source of the leak, using materials that are compatible with the tent’s fabric and air beam construction, and following the correct repair process from start to finish.
This guide is based on widely accepted repair practices used for inflatable camping equipment, manufacturer care recommendations, and the practical characteristics of modern air beam tents. Rather than promoting quick fixes, we focus on repair methods that are designed to restore safety, maintain structural integrity, and help extend the usable life of your tent.
Throughout this guide, you’ll also learn when a repair is likely to last, when it should only be considered a temporary solution, and when replacing a damaged air tube is the safer long-term choice. Our goal is to help you make informed decisions—not simply recommend products or unnecessary replacements.
Whether you’re repairing a small puncture at home or dealing with an unexpected air leak during a camping trip, the advice in this guide is designed to help you choose the most reliable solution for your situation.
Before You Start: Is Your Tent Actually Repairable?
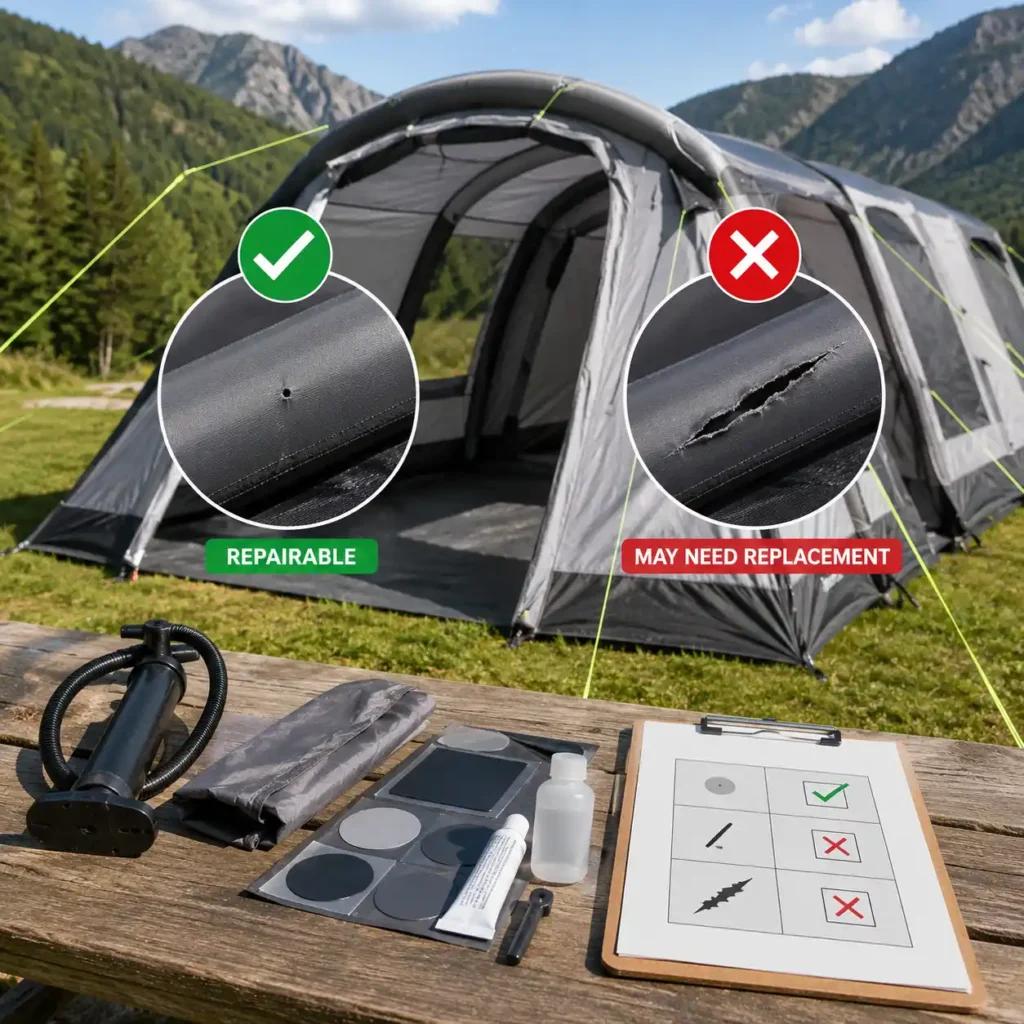
Before opening a repair kit, it’s worth determining whether the damage can actually be repaired. The good news is that most inflatable camping tents don’t need to be replaced after the first leak. In many cases, a simple puncture or loose valve can be repaired successfully, allowing the tent to perform reliably for many more camping trips.
The type, size, and location of the damage are what matter most. Small punctures and slow leaks are usually straightforward repairs, while major structural damage may require replacing the air tube or contacting the tent manufacturer for replacement parts.
Damage That Is Usually Repairable
Most inflatable tents can be repaired successfully if you have:
- A small puncture caused by a thorn, rock, or sharp object
- A pinhole leak that’s slowly releasing air
- A minor abrasion that hasn’t weakened the surrounding fabric
- A leaking valve that only needs cleaning, tightening, or replacing
- A small hole in the removable air beam bladder
With the correct repair materials and enough curing time, these repairs are often long-lasting and can restore normal performance.
Damage That May Require Replacement
Repairing isn’t always the safest or most reliable option. Consider replacing the air tube—or contacting the manufacturer—if you find:
- A long tear or split in the air beam
- Multiple damaged areas close together
- A burst seam on the air tube
- Extensive fabric delamination around the damaged area
- Damage caused by excessive heat or prolonged UV exposure that has weakened the material
In these situations, even a successful patch may not restore the original strength of the air beam.
A Simple Rule to Remember
If the damage is small, isolated, and the surrounding material is still in good condition, a repair is usually worthwhile.
If the damage affects the structure of the air beam, multiple seams, or a large section of the material, replacing the damaged component is typically the safer long-term solution.
By identifying the type of damage before starting, you’ll avoid wasting time on repairs that aren’t likely to last and choose the most reliable solution from the beginning.
Common Causes of Air Beam Damage
Inflatable camping tents are designed to withstand years of outdoor use, but even durable air beam systems have their limits. Most leaks don’t happen because the tent is poorly made—they’re usually the result of sharp objects, improper handling, environmental exposure, or normal wear over time.
Understanding what caused the damage is often the first step toward making a successful repair and preventing the same problem from happening again.
Sharp Objects on the Ground
The most common cause of air beam damage is contact with sharp objects during pitching or packing. Thorns, broken branches, sharp stones, exposed roots, and even small pieces of glass can puncture the air tube or damage the protective sleeve surrounding it.
Taking a few minutes to clear the campsite before setting up can prevent many of these problems. Adding a protective ground layer also helps reduce wear on the tent floor and minimizes the risk of hidden punctures from rough terrain. If you don’t already use one, our guide to 5 Best Tent Footprints and Ground Tarps in 2026 (Protect Your Tent Floor) explains how to choose the right footprint for your tent and campsite conditions.
Incorrect Inflation Pressure
Overinflating an air beam places unnecessary stress on the seams and internal structure. As temperatures rise during the day, the air inside the tubes expands, increasing internal pressure even further.
Always inflate your tent according to the manufacturer’s recommended pressure rather than simply making the beams feel as firm as possible. If you’re unsure, it’s better to use a pressure gauge than to rely on feel alone.
Abrasion During Use
Repeated rubbing against rough ground, tree branches, roof racks, or other camping equipment can gradually wear away protective materials. While abrasion may not cause an immediate puncture, it often weakens the fabric enough for leaks to develop later.
Inspect high-contact areas after each trip, especially around corners, attachment points, and sections that frequently touch the ground during setup.
Valve Problems
Not every air leak comes from the air beam itself. Dirt, sand, worn seals, or a valve that hasn’t been fully tightened can allow air to escape slowly, making it appear as though the tube has been punctured.
Before looking for holes in the air beam, always inspect the valve. A quick cleaning or tightening may solve the problem without the need for patches or adhesive.
Age, UV Exposure, and Weather
Over time, prolonged exposure to sunlight, heat, freezing temperatures, and repeated inflation cycles gradually reduce the flexibility of many synthetic materials. Older air beams and repair patches may become less elastic, increasing the likelihood of cracks, seam failures, or slow leaks.
Regular inspection before each camping season helps identify these issues before they become larger problems and extends the overall lifespan of your inflatable tent.
💡 Pro Tip: Before applying any repair patch, make sure you’ve identified the actual source of the leak. A valve leak requires a completely different solution than a punctured air beam, and repairing the wrong area won’t solve the problem.
Tools & Materials You'll Need

Having the right repair materials before you start will make the process faster, easier, and much more reliable. While emergency repairs can sometimes be made with basic supplies, using products specifically designed for inflatable camping tents usually produces stronger, longer-lasting results.
You don’t need a large collection of tools, but each item serves an important purpose during the repair.
Essential Repair Supplies
For most inflatable tent repairs, you’ll need:
- Manufacturer-approved repair patches or compatible TPU repair patches
- Adhesive recommended for inflatable tent materials (if patches aren’t self-adhesive)
- Isopropyl alcohol and a clean lint-free cloth for surface preparation
- A small pair of scissors to trim repair patches
- A soft roller or plastic card to press the patch firmly into place
- A spray bottle with soapy water for locating slow air leaks
- A marker or masking tape to identify the damaged area
Preparing everything in advance helps prevent mistakes once the adhesive has been applied.
Should You Buy a Tent Repair Kit?
If you only camp occasionally, buying individual repair materials may not be necessary. A quality repair kit usually includes the essential supplies needed to fix common punctures and small leaks in one convenient package.
If you’re looking for a dependable option, our guide to 5 Best Tent Repair Kits in 2026 (Patches, Tape & Emergency Fixes) compares the best repair kits for different tent materials, budgets, and emergency situations.
Optional Tools That Make Repairs Easier
Although not essential, a few additional tools can improve the quality of your repair:
- A low-pressure air pump with a built-in pressure gauge
- A flashlight for inspecting valves and seams
- A small mirror for checking hard-to-see areas
- Disposable gloves when working with strong adhesives
- A measuring tape for trimming larger repair patches accurately
These tools aren’t required, but they can make the repair process more precise and help avoid unnecessary mistakes.
💡 Pro Tip: Avoid using household glues, super glue, duct tape, or generic vinyl repair kits unless the tent manufacturer specifically recommends them. Incompatible adhesives can damage TPU-coated materials or create repairs that fail after only a few inflation cycles.
How to Find an Air Leak in an Inflatable Tent
Finding the exact source of the leak is the most important part of a successful repair. Even the best repair patch won’t solve the problem if it’s applied to the wrong location. Before reaching for adhesive or replacement parts, take a few minutes to inspect the entire air system carefully.
Some leaks are obvious, while others may release air so slowly that they take hours to notice. Working methodically will save time and help avoid unnecessary repairs.
1. Inflate the Air Beam Fully
Inflate the affected air beam to the pressure recommended by the manufacturer. Avoid overinflating it, as excessive pressure can enlarge an existing puncture or place additional stress on weakened seams.
If the beam loses pressure almost immediately, you’re likely dealing with a larger puncture or a valve issue. Slow pressure loss usually indicates a pinhole leak or a small seam defect.
2. Listen Carefully
Move to a quiet area and slowly rotate the inflated air beam while listening for a faint hissing sound. Larger punctures are often easy to locate by sound alone.
Pay close attention around valves, seams, bends, and any areas that may have rubbed against rocks or branches during previous trips.
3. Use Soapy Water
If you can’t hear the leak, mix a small amount of dish soap with water in a spray bottle and lightly spray the suspected area.
Escaping air will create a cluster of small bubbles, making even tiny punctures easy to identify. This is one of the simplest and most reliable methods used for locating slow leaks in inflatable camping equipment.
4. Mark the Leak Immediately
Once you’ve found the leak, dry the area thoroughly and mark it with a washable marker or a small piece of masking tape.
It’s surprisingly easy to lose track of a tiny puncture after the air beam has been deflated for repair.
5. Check the Valve Before Applying a Patch
Not every air leak comes from a hole in the air beam. Before preparing a repair patch, inspect the valve for dirt, damaged seals, or loose threads.
Cleaning or tightening the valve may solve the problem without repairing the air beam itself.
If you discover that the damage extends beyond the inflatable tube—such as tears in the tent fabric or damage to other structural components—our complete guide to How to Repair a Tent (Fix Tears, Leaks & Poles That Actually Hold) explains how to repair the most common types of tent damage.
💡 Pro Tip: Never begin a repair until you’re completely confident you’ve located the exact source of the leak. Spending five extra minutes on inspection can save you from repeating the entire repair later.
Step-by-Step: How to Repair an Inflatable Camping Tent
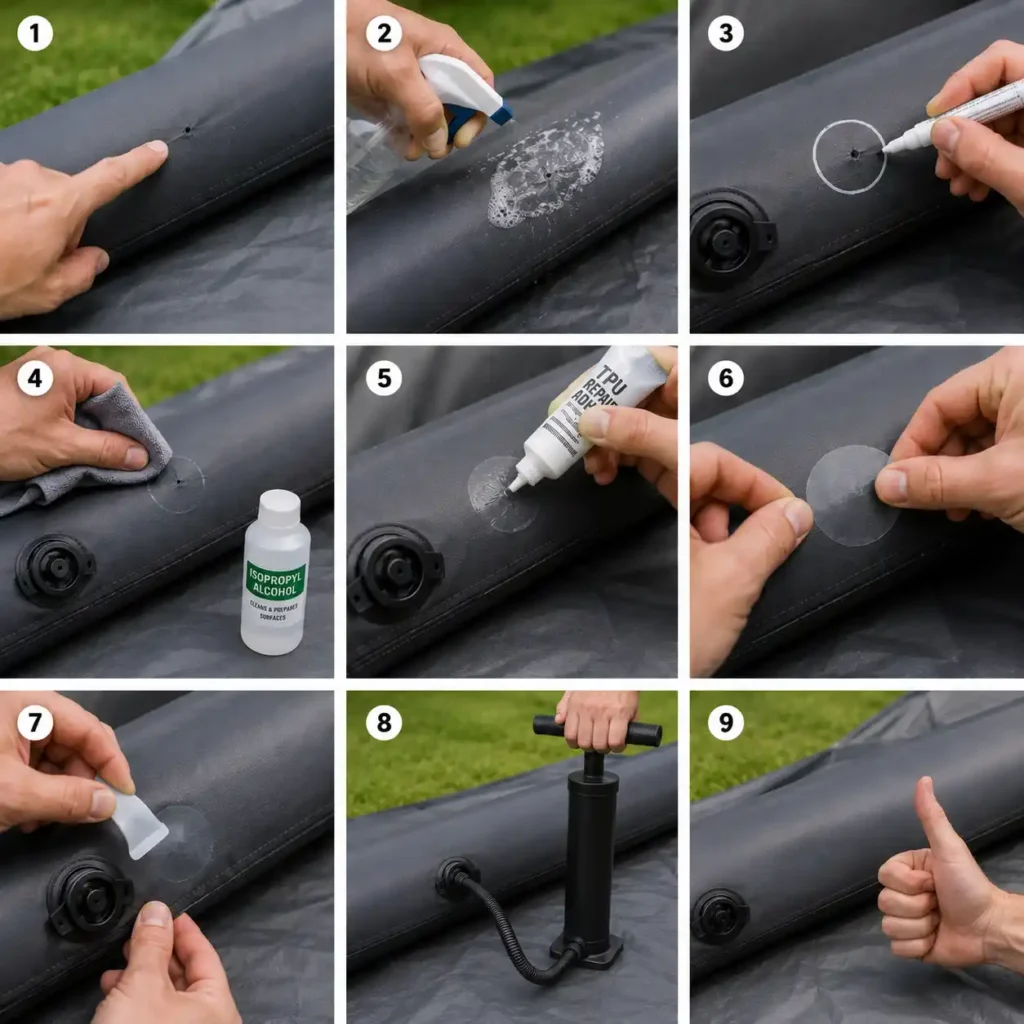
Once you’ve identified the exact location of the leak, you can begin the repair. Taking your time during each step is far more important than trying to finish quickly. Most repair failures happen because the surface wasn’t prepared properly or the adhesive wasn’t given enough time to cure.
Follow the steps below for the most reliable and long-lasting repair.
Step 1: Deflate and Remove the Air Beam (If Possible)
Completely deflate the damaged air beam before beginning the repair. If your tent uses removable air tubes, carefully remove the affected beam from its protective sleeve.
Working on a flat surface makes the repair easier and helps ensure the patch bonds evenly. If the air beam can’t be removed, spread the tent on a clean, dry surface and expose the damaged section as much as possible.
Step 2: Clean the Damaged Area
Dirt, dust, moisture, sunscreen, and natural oils from your hands can all reduce the strength of the repair.
Clean the damaged area with isopropyl alcohol and allow it to dry completely before applying any adhesive or repair patch. The surface should be completely clean, dry, and free from debris.
Step 3: Prepare the Repair Patch
Cut a repair patch so that it extends at least 1 inch (2.5 cm) beyond the puncture on all sides.
Rounding the corners helps prevent the edges from lifting over time, especially after repeated inflation and deflation.
If you’re using a patch that requires adhesive, apply it exactly as directed by the manufacturer rather than using excessive amounts of glue.
Step 4: Apply the Patch Carefully
Position the patch directly over the puncture and press firmly from the center outward to remove any trapped air bubbles.
Use a small roller, plastic card, or your thumb to apply even pressure across the entire patch. Pay particular attention to the edges, as these are the areas most likely to peel if not bonded properly.
Step 5: Allow the Repair to Cure
Resist the temptation to inflate the air beam immediately.
Most adhesives require several hours to cure, while some repairs achieve maximum strength only after 24 hours. Always follow the curing time recommended by the repair kit or adhesive manufacturer.
Inflating the beam too soon is one of the most common reasons a repair fails.
Step 6: Reinstall and Inspect
Once the repair has fully cured, reinstall the air beam if it was removed and inflate it to the recommended pressure.
Inspect the repaired area carefully for any signs of lifting edges or continued air loss before packing the tent for your next trip.
💡 Pro Tip: Never rush the curing process. A patch that cures overnight is far more likely to provide a durable repair than one that’s inflated after only a few minutes.
How to Test the Repair Before Your Next Camping Trip
A repair isn’t finished when the patch has been applied—it’s finished when you’re confident the air beam holds pressure reliably. Testing the repair before your next camping trip reduces the risk of discovering another leak after you’ve already arrived at the campsite.
Spending a few extra minutes at home is far easier than dealing with a deflated tent in bad weather.
Inflate to the Recommended Pressure
After the adhesive has fully cured, inflate the repaired air beam to the pressure recommended by the manufacturer.
Avoid adding extra pressure to “test its strength.” Overinflating places unnecessary stress on both the repair and the surrounding material.
Let the Tent Stand
Leave the inflated tent standing for several hours—or overnight if possible.
A properly repaired air beam should maintain consistent pressure throughout the test. Minor pressure changes caused by cooler nighttime temperatures are normal, but noticeable softening usually indicates that air is still escaping.
Inspect the Repaired Area
Carefully examine the repair for:
- Edges beginning to lift
- Wrinkles or gaps beneath the patch
- New bubbles when checked with soapy water
- Signs of air escaping around the valve
If everything remains secure, the repair is likely ready for normal use.
Perform One Final Leak Check
Before packing the tent, repeat the soapy water test around the repaired area and nearby seams.
This final inspection helps confirm that there aren’t multiple punctures or a second slow leak that was missed during the initial repair.
Pack the Tent Carefully
Once you’re satisfied with the repair, allow the tent to dry completely before packing it away.
Storing a damp tent can encourage mold growth, unpleasant odors, and unnecessary wear over time. If your tent became wet during the repair process or while leak testing, our guide to How to Dry Camping Gear Fast After Rain explains the safest ways to dry your equipment before storage.
💡 Pro Tip: Don’t judge a repair after only a few minutes. A tent that remains fully inflated overnight is a much better indication that the repair will hold up during your next camping trip.
How to Make a Temporary Field Repair
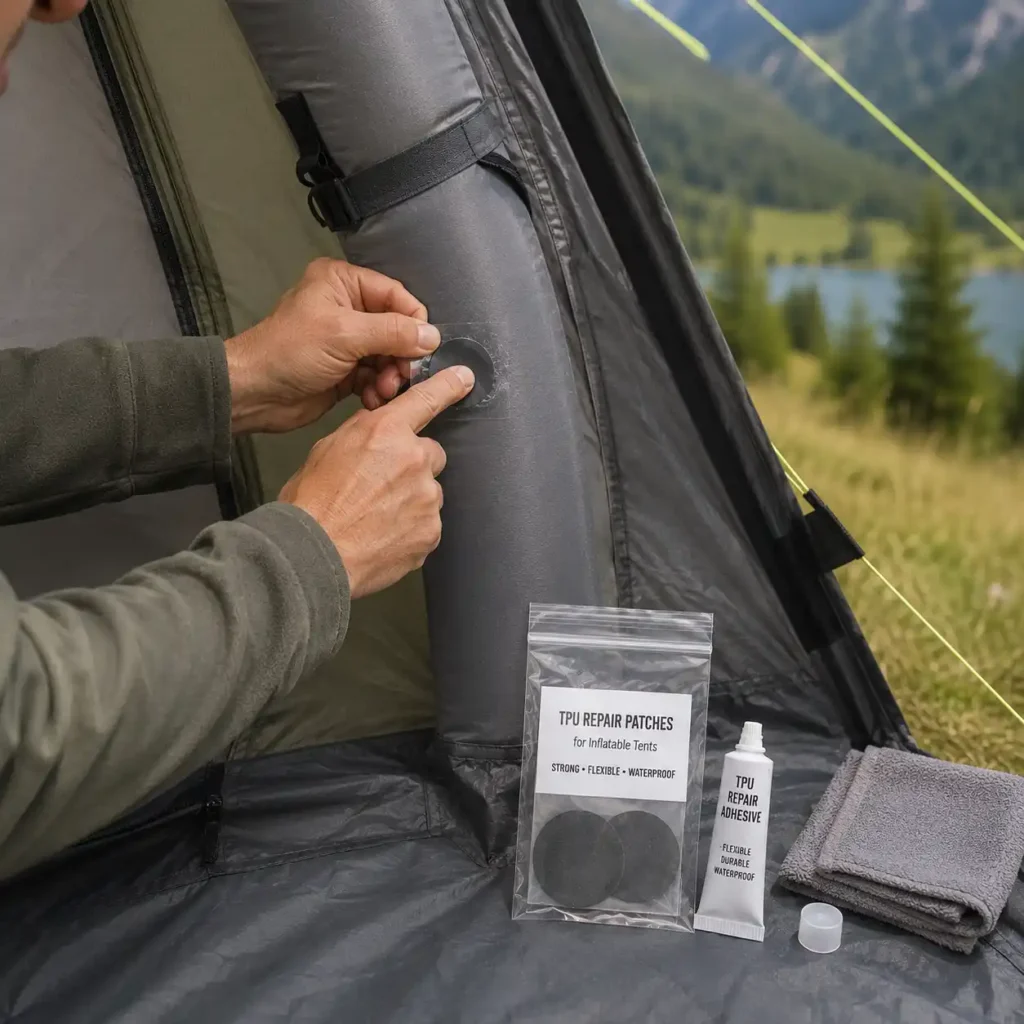
Not every puncture happens at home. If your inflatable tent starts losing air during a camping trip, a temporary field repair can often keep the tent usable until you return home and perform a permanent repair.
The goal of an emergency repair isn’t to create a perfect seal—it’s to restore enough air retention to finish your trip safely.
Clean the Area as Well as Possible
Even in the field, take a moment to remove dirt, mud, sand, and moisture from the damaged area.
A clean surface gives emergency patches the best chance of sticking securely.
Use a Self-Adhesive Repair Patch
Self-adhesive TPU patches are one of the easiest options for emergency repairs because they don’t require mixing adhesives or waiting for long curing times.
Press the patch firmly over the puncture and smooth it outward from the center to remove trapped air.
Reduce Air Pressure Slightly
If the repair is only temporary, avoid inflating the air beam to its maximum recommended pressure.
A slightly lower pressure reduces stress on the patch while still providing enough structural support for normal camping conditions.
Inspect the Patch Regularly
Check the repair several times throughout the day, especially after significant temperature changes.
Heat can increase internal air pressure, while cooler evenings may make the beam feel softer even if the repair is holding properly.
Perform a Permanent Repair at Home
Emergency patches should be considered a short-term solution whenever possible.
Once you’re home, remove the temporary repair if recommended by the manufacturer, inspect the damage carefully, and complete a permanent repair using the correct materials and curing time.
If the tent became wet during your trip, allow every part of it to dry completely before storing it. Our guide to How to Store Camping Gear Properly: The Ultimate Guide explains how to prevent moisture damage, mold, and premature wear between camping trips.
💡 Pro Tip: Always carry a small repair kit in your camping gear. A few TPU patches, alcohol wipes, and a compact pump take up very little space but can prevent a minor puncture from ending your camping trip early.
Common Mistakes to Avoid When Repairing an Inflatable Tent
Even small mistakes can turn a simple puncture into a repair that fails after only a few uses. Fortunately, most problems are easy to avoid once you know what to look for.
Here are the most common mistakes people make when repairing an inflatable camping tent.
Applying a Patch to a Dirty Surface
Dust, sand, sunscreen, insect repellent, and moisture can all prevent a repair patch from bonding properly.
Always clean the damaged area thoroughly with isopropyl alcohol and allow it to dry completely before applying any adhesive or patch.
Repairing the Wrong Location
One of the most common mistakes is patching the place where you think the leak is instead of confirming the exact source.
Always complete a careful leak inspection before beginning the repair. Even a high-quality patch won’t solve the problem if the actual puncture is somewhere else.
Inflating the Air Beam Too Soon
Many repair adhesives continue curing long after the patch feels secure.
Inflating the air beam before the recommended curing time has passed can weaken the bond, create small gaps around the edges, and significantly shorten the life of the repair.
Using the Wrong Adhesive
Not every adhesive is suitable for inflatable tent materials.
Some household glues become brittle after drying, while others may react poorly with TPU-coated fabrics. Always use repair products recommended by the tent manufacturer or those specifically designed for inflatable outdoor equipment.
Ignoring Small Leaks
A slow leak may seem harmless, but tiny punctures rarely stay the same size.
Repairing a pinhole early is usually much easier than dealing with a larger tear after several more camping trips.
Skipping Regular Maintenance
Many repairs could be avoided altogether with a quick inspection before and after each trip.
Checking air beams, valves, seams, and high-wear areas only takes a few minutes and often reveals small problems before they become expensive repairs.
Regular maintenance also includes protecting the tent from prolonged moisture during storage. If your shelter has been packed away while damp, our guide to How to Clean a Moldy Tent: A Step-by-Step Guide explains how to safely remove mold and help prevent long-term fabric damage.
💡 Pro Tip: Most failed repairs aren’t caused by poor-quality repair kits—they’re caused by rushing the process. Careful preparation and patience almost always produce better results than trying to finish the repair as quickly as possible.
When Should You Replace an Air Beam Instead of Repairing It?
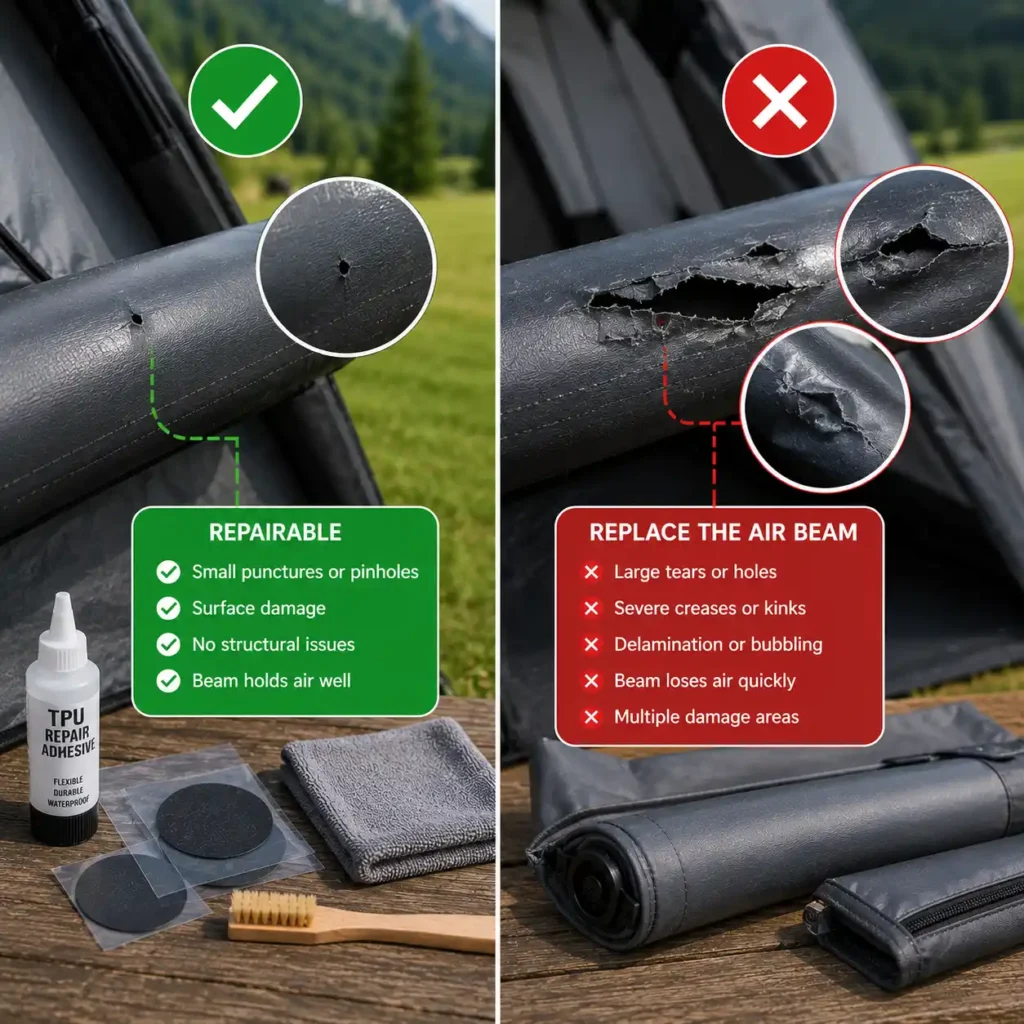
While most punctures can be repaired successfully, there are situations where replacing the damaged air beam is the safer and more reliable solution. Continuing to repair severely damaged components may increase the risk of repeated air leaks or even structural failure during your camping trip.
Knowing when to stop repairing and replace the damaged part can save both time and money in the long run.
Before deciding whether to continue using a damaged air beam, it’s also worth reviewing the U.S. Consumer Product Safety Commission (CPSC) guidance on camping equipment safety.
Large Tears and Split Seams
Small punctures are usually excellent candidates for repair, but long tears or split seams are much more difficult to restore.
Because these areas are subjected to constant internal pressure, even a well-applied patch may not fully restore the original strength of the air beam.
Repeated Repairs in the Same Area
If the same section has already been patched multiple times, the surrounding material may have weakened.
Adding another patch often creates additional stress around the repaired area, making future failures more likely.
Aging Materials
Even without obvious damage, inflatable air beams gradually lose flexibility after years of exposure to sunlight, heat, freezing temperatures, and repeated inflation cycles.
If the material feels brittle, cracked, or permanently stretched, replacement is often a better long-term investment than another repair.
Manufacturer Replacement Parts Are Available
Many inflatable tent manufacturers sell replacement air beams or individual bladders.
If a replacement part is available at a reasonable cost, installing a new air tube may provide better reliability than attempting another repair—especially before an extended camping trip.
Consider the Overall Condition of the Tent
Before investing in replacement parts, take a moment to evaluate the condition of the entire tent.
If the flysheet, groundsheet, zippers, and seams are still in excellent shape, replacing a damaged air beam can significantly extend the life of your shelter. On the other hand, if several major components are already worn out, replacing the entire tent may be the more practical and cost-effective choice.
💡 Pro Tip: A single puncture rarely means an inflatable tent has reached the end of its life. Replace the air beam only when the damage affects its structural integrity or repeated repairs are no longer providing reliable results.
Frequently Asked Questions
Can an inflatable camping tent be repaired?
Yes. Most inflatable camping tents can be repaired successfully if the damage is limited to a small puncture, pinhole leak, or minor valve issue. Using a compatible repair patch and following the correct repair procedure often restores the air beam for many more camping trips. However, large tears, split seams, or severely weakened materials may require replacing the air beam instead.
How do I find a leak in an inflatable tent?
Start by inflating the air beam to the manufacturer’s recommended pressure. Listen for escaping air, inspect the valve, and spray suspected areas with soapy water. Escaping air creates visible bubbles, making even small punctures easier to locate. Mark the damaged spot before deflating the air beam for repair.
Why is my inflatable tent losing air overnight?
A small pressure drop overnight doesn’t always indicate a leak. Cooler nighttime temperatures naturally reduce air pressure inside the beam. If the tent becomes noticeably softer or continues losing pressure throughout the day, inspect the valve and check the air beam for punctures using the soapy water method.
Can I repair an inflatable tent without a repair kit?
It’s possible to make a temporary emergency repair using self-adhesive patches or specialized repair tape if that’s all you have available. However, for a long-lasting repair, it’s best to use materials specifically designed for inflatable camping tents. Household tape or unsuitable adhesives rarely provide a reliable long-term solution.
How long does an inflatable tent repair last?
A properly completed repair can last for many years. Durability depends on the size of the damage, the quality of the repair materials, proper surface preparation, and allowing the adhesive to cure fully before reinflating the air beam.
Can I use duct tape to repair an inflatable tent?
Duct tape should only be considered a temporary emergency solution. It may help reduce air loss during a camping trip, but it doesn’t create a permanent airtight seal and often leaves adhesive residue behind. For reliable results, use repair patches designed for TPU or the material recommended by your tent manufacturer.
Can I replace a damaged air beam?
Yes. Many inflatable tent manufacturers sell replacement air beams or individual air bladders. If the damage is extensive or previous repairs have failed, replacing the damaged air beam is often a safer and more reliable option than applying additional patches.
Is it safe to camp with a repaired air beam?
In most cases, yes. If the repair has fully cured, the air beam maintains the recommended pressure, and no additional leaks are detected during testing, the tent is generally safe for normal camping use. Always inspect the repaired area before each trip and avoid using a tent with significant structural damage.
How can I prevent air leaks in an inflatable camping tent?
Inspect the tent regularly, avoid pitching on sharp ground, use a protective footprint, inflate the air beams to the recommended pressure, and store the tent clean and completely dry. Routine maintenance and careful handling are the most effective ways to reduce the risk of future punctures and extend the life of your inflatable tent.
Conclusion
Repairing an inflatable camping tent is usually much easier than many campers expect. Most small punctures, pinhole leaks, and minor valve problems can be fixed at home with the right repair materials, careful preparation, and a little patience.
The key to a successful repair is taking the time to locate the exact source of the leak, thoroughly clean the damaged area, and follow the manufacturer’s recommendations for patching and curing. Rushing the process or using unsuitable materials often leads to repairs that fail sooner than necessary.
It’s equally important to inspect your tent regularly, use a protective footprint, avoid overinflation, and store your shelter completely dry after every trip. A few minutes of preventative maintenance can significantly reduce the chances of future air leaks and help extend the life of your inflatable tent.
While severe tears or heavily worn air beams may eventually require replacement, the vast majority of common leaks can be repaired successfully, allowing you to enjoy many more camping adventures without replacing the entire tent.
Whether you’re fixing a tiny puncture at home or making an emergency repair at the campsite, following the steps in this guide will help restore your inflatable camping tent safely, reliably, and with confidence.