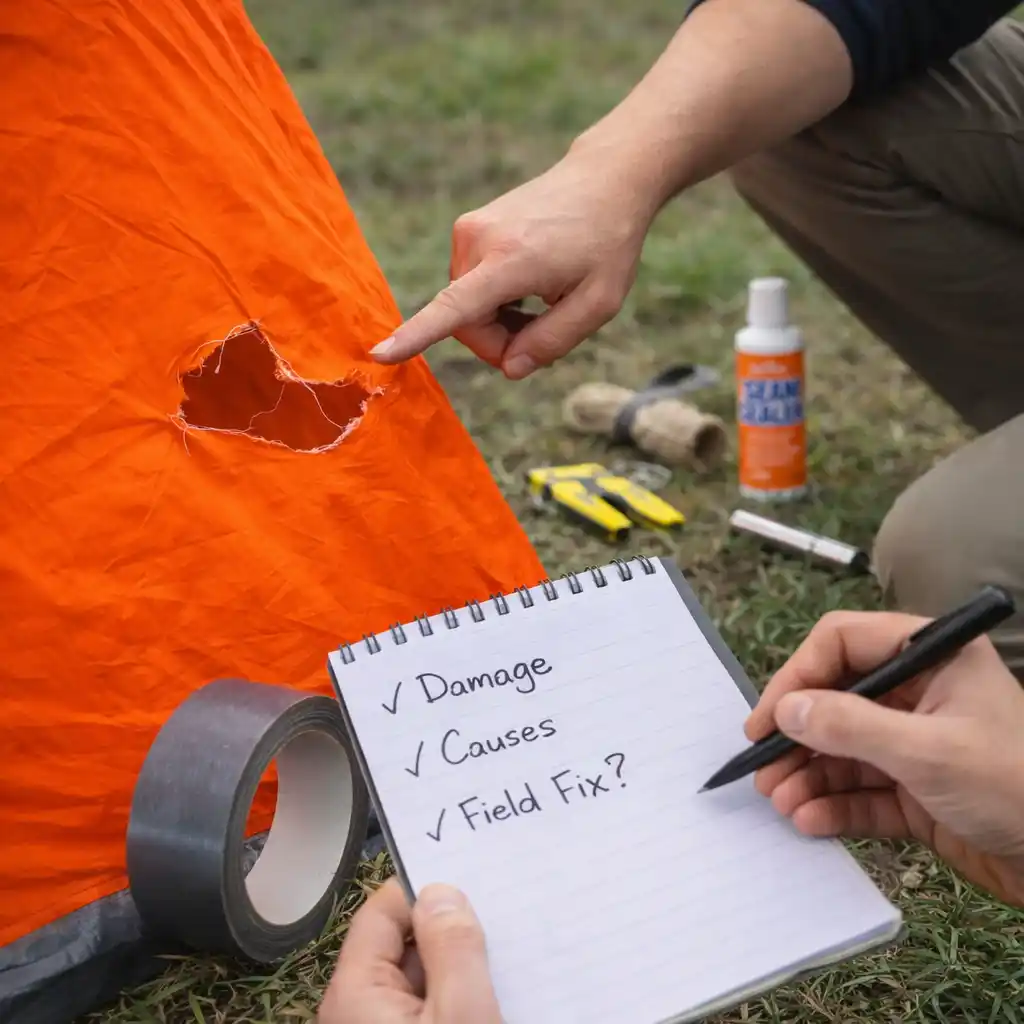
Most advice on how to repair a tent sounds simple — until you try fixing a tear at camp, in the wind, with limited gear, and nothing sticks.
Hi, I’m Anthony.
After years of camping in different conditions, I’ve learned one thing the hard way: tent damage never happens when it’s convenient. It happens in the rain, late at night, or halfway through a trip — when you need your shelter to work, not fail.
And here’s the reality most guides don’t tell you:
Tent repair isn’t about patches or glue.
It’s about understanding failure points, materials, and what actually holds under stress.
I’ve repaired torn rainflies in storms, patched floor punctures on rocky ground, and reinforced seams that failed mid-trip. Some fixes lasted weeks. Others failed within hours.
This guide is for campers who want fast, reliable fixes — not temporary patches that fail overnight.
As an Amazon Associate, we earn from qualifying purchases.

Fix your tent fast: here’s exactly what to do based on the type of damage.
⚡ How to Repair a Tent (Quick Answer)
To repair a tent:
— clean and dry the damaged area
— apply repair tape or patch depending on the damage
— seal seams if leaking
— reinforce high-stress points
For field fixes, use tape. For long-term durability, use patches and seam sealer.
Jump to your problem:
Fabric tear → see “How to Repair a Tent Tear”
Leaking tent → see “How to Fix a Tent Leak”
Seam failure → see “How to Repair Tent Seams”
Broken pole → see “How to Fix a Broken Tent Pole”
🔍 Why Tents Fail in the First Place (And Why Most Repairs Don’t Last)
If your tent damage is caused by moisture or long-term wear, it’s worth understanding how waterproofing actually works. See our guide on How to Waterproof a Tent: The Ultimate Guide to Staying Dry (2026).
Most tent damage comes down to stress concentration + material fatigue — not accidents.
Common failure points:
— high-tension seams (guyline corners, ridgelines)
— thin floor fabric under pressure points
— UV-weakened rainflies
— zippers under dirt and tension
Here’s where most people go wrong:
They fix the visible damage, not the stress causing it.
That’s why patches peel, seams reopen, and tears grow.
If you don’t reduce tension or reinforce the area — the repair is temporary at best.
Most repairs hold longer when you remove the stress behind the damage, not just cover it.
⚠️ Most Common Tent Damage (Field-Tested Reality)

1. Fabric Tears (Rainfly or Body)
Tent rainfly tear close up ripstop nylon damage outdoors
Usually caused by:
— wind stress
— snagging on branches
— over-tensioned guylines
These tears tend to spread fast if not stabilized immediately.
2. Floor Punctures
Tent floor puncture small hole from rock ground camping
Often from:
— sharp rocks
— debris under tent
— kneeling pressure
Small holes turn into leaks quickly — especially in wet conditions.
3. Seam Failures
Tent seam tape peeling waterproof seam failure inside tent
Common after:
— prolonged use
— heat exposure
— cheap seam sealing
This is one of the most underestimated problems — and one of the hardest to fix properly.
4. Broken Poles
Broken tent pole bent aluminum pole camping repair sleeve
Usually from:
— strong wind gusts
— improper setup
— stress from uneven tension
Pole failure often cascades into fabric damage.
5. Zipper Failures
Tent zipper stuck misaligned teeth camping gear repair
Caused by:
— dirt buildup
— misalignment
— fabric tension
Zippers rarely “break suddenly” — they degrade over time.
Many of these issues — especially seam failure and floor leaks — are often caused by condensation and trapped moisture. Learn how to prevent it in How to Stop Condensation in a Tent: 7 Tips to Stay Dry (2026).
🧰 Tools You’ll Need for Tent Repair
— repair tape (fabric-specific)
— seam sealer
— fabric patches
— alcohol wipes (surface prep)
— pole repair sleeve
Optional:
— needle and thread (for permanent fixes)
🧠 What Actually Matters Before You Repair Anything
Before you grab a patch or tape, stop.
Ask yourself:
— Is the area under tension?
— Is the fabric clean and dry?
— Will this repair flex or stay rigid?
— Is this temporary or permanent?
Most failed repairs happen because people skip this step.
A repair that ignores tension will fail — no matter how strong the adhesive is.
🛠️ How to Repair a Tent Tear (That Won’t Reopen)
Time to fix: 2–5 minutes
Difficulty: Easy
Tent repair patch applied correctly on nylon fabric outdoor setup
Step-by-step:
1️⃣ Clean the area (dry cloth, remove dirt/oil)
2️⃣ Flatten the fabric completely
3️⃣ Apply repair tape on both sides if possible
4️⃣ Round patch edges (prevents peeling)
5️⃣ Press firmly and let it bond
Field reality:
— Tape works best for ripstop nylon and polyester
— Duct tape is a temporary fix only
— Cold temperatures reduce adhesion
Pro insight:
If the tear is along a stress line — reinforce beyond the tear, not just over it.
💧 How to Fix a Tent Leak (Rainfly or Floor)
Time to fix: 10–20 minutes
Difficulty: Medium

Tent waterproof repair seam sealer applied on rainfly outdoor
Leaks are rarely just “holes.”
They usually come from:
— degraded coatings
— seam failure
— micro-abrasions
What works:
— seam sealer for stitching
— liquid waterproof coatings for worn areas
— patches for visible holes
What doesn’t:
— random glue
— overusing tape on flexible areas
Waterproofing needs flexibility — rigid fixes crack over time.
If leaks keep coming back, the problem is often deeper than a single repair. This breakdown explains why: Why Tents Condense at Night (And Why Venting Isn’t Enough) in 2026.
For official guidance on waterproofing and gear maintenance, refer to the National Park Service recommendations on backcountry equipment care — their guidelines align closely with real-world repair practices and long-term durability standards.
🧵 How to Repair Tent Seams Properly
Time to fix: 30+ minutes (including drying time)
Difficulty: Medium

tent seam sealing process brush application waterproof coating
This is where most DIY repairs break down.
Correct method:
1️⃣ Clean seam thoroughly
2️⃣ Apply seam sealer evenly
3️⃣ Let it cure fully (no shortcuts)
4️⃣ Reapply if needed
Key insight:
Peeling seam tape is a symptom — not the root issue.
The real issue is adhesion failure due to age or heat exposure.
For a complete step-by-step waterproofing approach, including coatings and fabric treatments, see How to Waterproof a Tent: The Ultimate Guide to Staying Dry (2026).
🪵 How to Fix a Broken Tent Pole in the Field
Time to fix: 5–10 minutes
Difficulty: Easy

Tent pole repair sleeve installed emergency fix camping gear
Fast field repair:
— use a pole repair sleeve
— align broken sections
— secure with tape or cord
Reality check:
This is a temporary structural fix — not permanent.
Pole stress distribution changes after repair, so expect reduced stability.
Pole damage is often caused by poor ground setup or unstable anchoring. Choosing the right stakes can prevent this — see 7 Best Tent Stakes for Hard Ground (2026): Field-Tested in Rocky Soil.
🔧 Emergency Repairs vs Permanent Fixes (Know the Difference)

This is critical.
Emergency repair:
— fast
— minimal tools
— gets you through the night
Permanent repair:
— requires proper materials
— done at home
— restores long-term reliability
Most people confuse the two — and that’s why gear fails later.
🔧 Tent Repair Methods vs Problems (What Works and What Fails)
| Repair Method | Best For | Durability | Field Use | Key Limitation |
|---|---|---|---|---|
| Repair Tape | Small tears, fabric damage | Medium | Excellent | Fails under tension or moisture |
| Duct Tape | Emergency quick fixes | Low | Excellent | Peels quickly, poor adhesion on fabric |
| Fabric Patch (Adhesive) | Larger tears, reinforcement | High | Good | Requires clean, dry surface |
| Seam Sealer | Leaks, seam failures | High | Limited | Needs curing time |
| Pole Repair Sleeve | Broken poles | Medium | Excellent | Temporary structural fix |
| Sewing + Reinforcement | Major fabric damage | Very High | Poor | Requires tools and time |
Quick takeaway: Use tape for speed, seam sealer for leaks, and patches or stitching for anything that needs to last.
⚠️ Mistakes That Ruin Tent Repairs (And Why Fixes Fail)
Most tent repairs don’t fail because of bad materials — they fail because of bad decisions.
Here’s what goes wrong in real conditions:
❌ Applying tape on dirty or wet fabric
Adhesive won’t bond properly. Even high-quality repair tape fails quickly if the surface isn’t clean and dry.
❌ Ignoring tension on the damaged area
If the fabric is under stress, the repair will peel or tear again — no matter how strong it is.
❌ Using duct tape as a “solution”
It works for hours, not days. Moisture, movement, and temperature changes break it down fast.
❌ Over-relying on one fix
Tape, patches, and seam sealer all serve different purposes. Using the wrong method leads to repeat failure.
❌ Skipping curing time
Seam sealer and adhesives need time to set. Using the tent too soon weakens the repair.
❌ Fixing damage instead of the cause
If you don’t address why the damage happened (tension, abrasion, moisture), it will come back.
If a repair keeps failing, the problem isn’t the patch — it’s what’s causing the stress.
🧠 Pro Tips Most Tent Repair Guides Don’t Tell You
These are the small things that make the difference between a repair that lasts hours — and one that holds for years.
✔ Warm the fabric before applying tape
Cold fabric reduces adhesion. Even warming the area with your hands improves how well the patch bonds.
✔ Always go beyond the damaged area
A patch should extend past the tear. Fixing only the visible damage is why most repairs fail again.
✔ Reduce tension before repairing
Loosen guylines or reposition the tent. Repairs done under tension won’t hold.
✔ Drying matters more than washing
If moisture remains, adhesives weaken. A dry surface is more important than a perfectly clean one.
✔ Reinforce high-stress zones early
Don’t wait for damage. Strengthening seams and corners prevents failure altogether.
✔ Carry less, but carry the right tools
A small, high-quality repair kit works better than a bulky one filled with unreliable items.
Most long-lasting repairs aren’t stronger — they’re smarter.
🧭 What Actually Fails First (And What to Reinforce)
From experience, prioritize:
seams under tension
rainfly stress points
floor abrasion zones
zipper tracks
Not all parts of your tent matter equally.
Fixing the wrong area first wastes time — and risks failure later.
Before repairing floor damage, it helps to understand how ground protection works. This guide explains it clearly: What Is a Tent Footprint? Ground Tarps Explained & What Actually Protects Your Tent Floor (2026).
🧠 Buying Guide: What You Actually Need in a Repair Kit

Skip the generic kits.
Focus on:
— high-quality repair tape (fabric-specific)
— seam sealer
— pole repair sleeve
— alcohol wipes (surface prep matters)
Most kits fail because they include too many low-quality items instead of a few reliable ones.
A good repair kit is only part of the system. Proper gear storage also prevents damage in the first place — see How to Store Camping Gear Properly: The Ultimate Guide (2026).
⚠️ When You Should NOT Repair a Tent
Do not repair your tent if:
— large structural seams are failing
— fabric coating is peeling across multiple areas
— poles are repeatedly breaking
— water leaks occur in multiple zones
At that point, repairs become unreliable — replacement is the safer option.
❓ FAQ: Tent Repair (Quick Answers That Actually Help)
How do you repair a tear in a tent?
Clean and dry the area, then apply repair tape on both sides of the fabric if possible. Press firmly and round the edges of the patch to prevent peeling. For long-term durability, reduce tension around the damaged area.
What is the best way to fix a leaking tent?
Identify the source first — most leaks come from seams, not holes. Use seam sealer for stitching and waterproof coating for worn fabric. Tape alone usually fails on flexible areas.
Can you repair a tent in the field?
Yes, but field repairs are temporary. Use repair tape for fabric tears and a pole sleeve for broken poles. Always reinforce the repair properly once you’re back home in dry conditions.
Does tent repair tape really work?
Yes — if applied to clean, dry fabric and not under constant tension. High-quality tape can last for months, but poor surface prep is the main reason repairs fail.
How do you fix a broken tent pole?
Align the broken sections and slide a repair sleeve over the damaged area. Secure it with tape or cord. This restores basic structure but is not a permanent fix.
Should I repair or replace my tent?
Repair small damage like tears, leaks, or minor seam issues. Replace the tent if large structural areas fail, multiple seams degrade, or the fabric coating is worn out.
Why does my tent keep leaking even after repair?
Because the root cause isn’t fixed. Most leaks come from worn coatings or failing seams, not visible holes. Without sealing those areas properly, water will keep getting in.
Can duct tape fix a tent?
Only as a short-term emergency fix. It doesn’t bond well to tent fabrics, especially in wet or cold conditions, and usually fails within hours or days.
💰 Is It Worth Repairing a Tent?
Small repairs (tape, patches, seams) are almost always worth it.
But if repair costs approach 30–50% of a new tent, replacement is usually the better option — especially for older gear.
🏁 Final Verdict
If your tent is beyond repair, choosing the right replacement matters more than quick fixes. See Best Camping Tents for Every Type of Camper in 2026.
Tent repair isn’t about quick fixes — it’s about understanding stress, materials, and conditions.
Most repairs fail not because of bad products, but because they ignore how tents actually behave under load, moisture, and movement.
If you fix the cause — not just the damage — your repair will hold.
If you don’t, it will fail again. Usually at the worst possible moment.
🎯 Quick Decision Guide
— Small tear? → use patch + reinforce beyond edges
— Leak? → seam sealer, not tape
— Pole broken? → sleeve fix (temporary)
— Seam failing? → reseal properly at home
🔥 Bottom Line
A well-done repair can extend your tent’s life for years.
A bad repair won’t last a night.
The difference isn’t the gear — it’s how you use it.
— Anthony